
The complexity of installing a restaurant hood system should not be underestimated; it is a task that requires both precision and a thorough understanding of the various components involved.
From selecting the right hood size to understanding its functionalities, preparing the installation site, and finally, performing the installation itself, each step is crucial for ensuring the safety and efficiency of your restaurant’s kitchen.
In the following sections, we will explore these steps in detail, providing a comprehensive guide that aims to demystify the process and equip you with the knowledge to successfully install a restaurant hood system.
As a bonus, we’ll also delve into some essential tips for maintenance and safety post-installation, thereby extending the lifespan of your system and ensuring its continual performance.
With this guide, you’ll no longer have to feel overwhelmed when faced with the task of a hood installation.
Understanding Hood Types and Functions
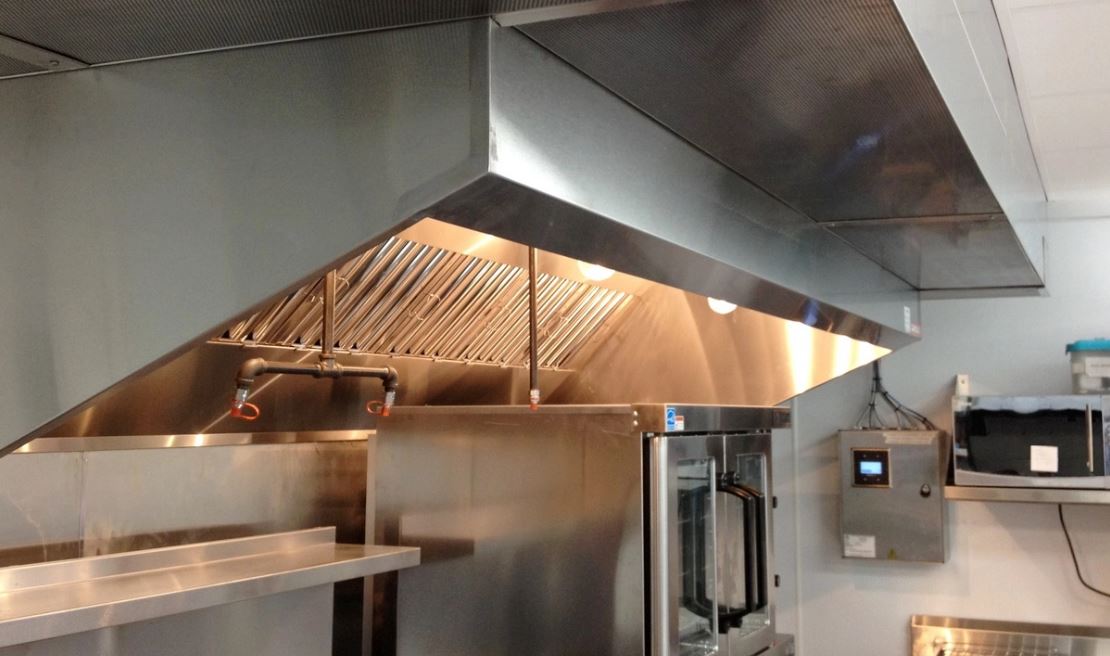
Navigating through the myriad of restaurant hood types and comprehending their specific functions is a crucial step in ensuring effective kitchen ventilation. The most common types are wall canopy, island canopy, proximity or low-profile hoods, and downdraft exhausts.
Wall canopy hoods, the most used type, are fixed directly to the wall and cover the cooking appliances beneath. Their design facilitates efficient capture of smoke, heat, and grease. Island canopy hoods operate similarly but are designed for appliances located at the center of the kitchen.
Proximity hoods, also called back shelf or low-profile hoods, are designed for limited spaces. They’re mounted closer to the cooking surface, thus requiring less exhaust air volume than wall-mounted hoods. Lastly, downdraft exhausts, though not as common in commercial kitchens, extract air through vents installed in the floor.
Each hood type presents unique advantages and is designed for specific kitchen layouts and cooking appliances. Therefore, understanding these types and their functions is paramount to achieving optimal kitchen ventilation, safety, and efficiency.
Choosing the Right Hood Size
Selecting the appropriate size for your restaurant’s hood is a critical aspect that significantly influences the ventilation system’s efficiency and effectiveness. A poorly sized hood can lead to inadequate ventilation, increased energy costs, and potential safety risks, so this decision should not be taken lightly.
Choosing the right hood size involves considering several factors:
– The size of your cooking equipment: The hood should extend six inches beyond the equipment on all sides for optimal capture and containment of cooking emissions.
– The type of cooking being performed: Different types of cooking (e.g., grilling, frying, broiling) produce varying amounts of heat and smoke and may require different hood sizes.
– Local building and fire codes: These codes often specify minimum requirements for hood size relative to the cooking surface.
Preparing for Installation
Before delving into the specifics of the installation process, it is imperative to properly prepare the workspace and ensure all necessary tools and equipment are ready for use. This step is crucial as a clean and organized workspace not only makes the installation process smoother but also ensures the safety of the personnel involved.
Start by clearing the area where the hood will be installed. Remove any obstructions, such as old fixtures or appliances. Next, check the condition of the electrical wiring and ventilation ducts. If issues are detected, seek professional help to correct them before proceeding.
The key tools required for a hood installation include a drill, screws, anchors, a level, and a measuring tape. Ensure these are in good working condition. Additionally, gather all necessary parts and hardware for the hood system. This may include the hood itself, filters, lights, ductwork, and the fan.
Lastly, review the installation manual thoroughly. Each hood model is unique and may require specific tools or steps. Being familiar with the manufacturer’s instructions can save time and prevent mistakes during installation.
Step-by-Step Hood Installation Process
Having ensured that your workspace is adequately prepared and all necessary tools and materials are on hand, we can now proceed to the actual installation of the restaurant hood, outlined in a detailed step-by-step process.
Firstly, align the hood with the markings you’ve made during the planning phase. This is crucial to ensure that your hood is properly positioned over the cooking area. Once aligned, secure the hood to the wall using the provided mounting hardware.
The next phase involves the following key steps:
– Connect the hood to the ductwork: Ensure the hood’s duct opening aligns with the building’s ductwork, then securely fasten.
– Install the filters: Slide the filters into their designated slots within the hood, ensuring they’re properly seated.
– Connect the electrical: Connect the hood’s electrical wires to the building’s electrical system, following local codes and regulations.
Tips for Hood Maintenance and Safety
Ensuring the longevity and optimal functionality of your newly installed restaurant hood, regular maintenance and adherence to safety guidelines are of paramount importance. A well-maintained hood system not only ensures a safe and clean cooking environment but also reduces the risk of costly repairs and replacements.
Maintenance should be a routine process. Regular cleaning, at least quarterly, is crucial to prevent the accumulation of grease that can lead to fire hazards. It’s recommended to hire a professional cleaning service capable of thoroughly cleaning the entire system, including the hood, filters, ducts, and exhaust fans.
Filters should be inspected and replaced as necessary, considering they play a significant role in trapping grease particles. Damaged or clogged filters can impair the hood’s performance and even pose a fire risk.
Additionally, a comprehensive check of the hood’s mechanical and electrical components should be performed periodically by a certified technician. This includes verifying the functionality of the exhaust fan, the hood’s lights, and the fire suppression system.
Safety should never be compromised. All staff should be trained on the proper usage of the hood system, fire safety procedures, and what to do in the event of an emergency. Always adhere to local fire codes and safety regulations.